Assignment 7 - Back-End Validate / Delete a Record
The goals of this assignment:
- Learn how to do back-end validation of data.
- Learn how to create a link that passes data to a servlet.
- Learn how to delete records.
Optional Code Clean-Up
Before moving on, you might want to revisit your old code and clean it up. Particularly, if you’ve taken CMSC 155, you should try doing this.
In the past we’ve done code like this:
$('#myfield').removeClass("is-invalid");
$('#myfield').addClass("is-valid");
This isn’t great code. Why? When we do $('#myfield') the JavaScript scans
the entire document, finds the element, and builds an object out of it. Which
is ok to do once. But multiple times? That’s waste. It is more efficient to do:
let myfield = $('#myfield')
myfield.removeClass("is-invalid");
myfield.addClass("is-valid");
Now we only scan the document once!
Also, our validation is repetitive. We can move our validation into a function.
function fieldValidate(field, regex) {
    // etc, set a boolean to valid or not
    return valid;
}

function saveChanges() {
    // etc
    let firstField = $('#first');
    valid = fieldValidate(firstField, /^[^0-9]{1,10}$/);
    if (!valid) success = false;
Requirements
Step 1 - Back-End Validate
Update your code to edit a record so that it also validates on the back-end. Refresh your memory on how to do this by looking at How to Validate in Java. Don’t insert the record if it fails the validation.
So that you can easily send bad data, you will need to temporarily disable your front-end validation (the JavaScript) to test the code. Remember you can hit ctrl-/ to disable sections of code.
Go ahead and re-enable the JavaScript checks when done with this section.
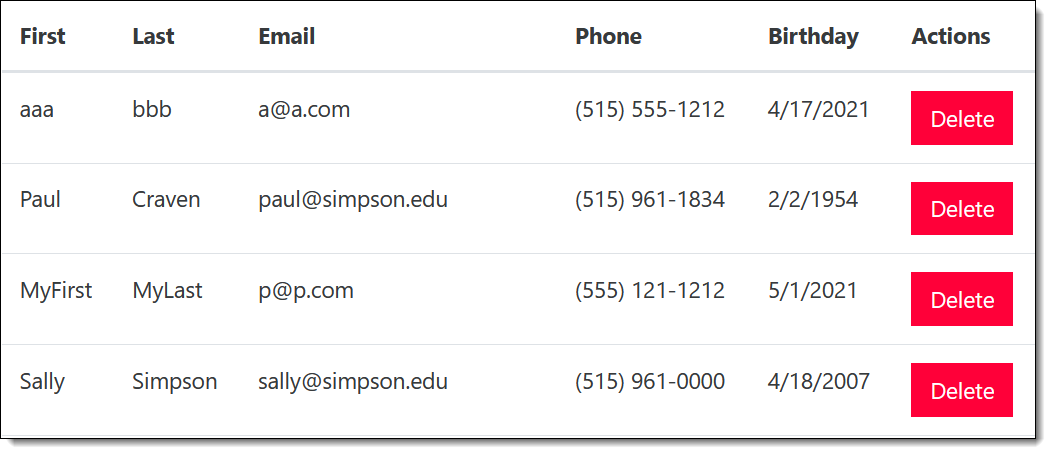
Step 2 - Add a Button
Go to your JavaScript code.
Find where you update the table and add in the rows. Might be called
updateTable.Update your row appending code to include a button in a table cell. Like:
<td> <button type='button' name='delete' class='deleteButton btn btn-danger' value='id'> Delete </button> </td>- Note that you will need to replace
idwith whatever variable holds that id. I’m leaving that up to you to figure out. - You’ll need to intelligently figure out how to place that HTML. Watch your cell starts, ends, and table row starts and ends. It is easy to mess that up.
- Update your
name_list.htmlpage so the table has an extra column. I just called the header ‘Actions’.
- Note that you will need to replace
Test to make sure the button shows up and the table structure looks right.
Step 3 - Add JavaScript
- Create this JavaScript function in your js file:
function deleteItem(e) {
    console.log("Delete");
    console.log(e.target.value);
}
Back in your
updateTablefunction, after adding the rows to the table, hook this new delete item function to all your buttons:var buttons = $(".deleteButton"); buttons.on("click", deleteItem);
Alternatively you can do it in one line:
$(".deleteButton").on("click", deleteItem);
It is nice that works not just for one button, but for every button matching that class.
Tip
This does not go at the end of your file like other buttons. Why? Because the delete button has not been created yet.
Also, don’t add the hook inside your
forloop, or you’ll add lots of hooks for each button.Test the button and make sure it prints the proper id to your console.
Create JavaScript to post to
api/name_list_delete. It should look a lot like the JavaScript for adding a new record, except the only thing we will pass is the id of the record we are deleting. That will shorten your code a lot. Test, and make sure it attempts to post the data. (You’re script will get a 404 of course.)Make sure your JavaScript calls
updateTablejust like you do when adding a person so that the table updates after record deletion.
Step 4 - Add Servlet
Now we need a servlet that will delete the records.=
Create a servlet that will delete the record based on the id. Pattern the servlet after the
NameListEditServletclass. It will be very similar.Call it
NameListDeleteServletor similar. Make sure the servlet name and the class name match. We don’t want a servlet name collision!Make sure it maps to
api/name_list_delete.The only field you should be receiving is the id. Don’t forget to validate it, unless you’ve mapped it to an integer. Then there’s no need.
Instead of calling
PersonDAO.addPerson()callPersonDAO.deletePerson().Create a method in
PersonDAOcalleddeletePerson. I’d copyaddPersonand use it as a template.Your SQL should look like:
delete from person where id = ?
Step 5 - Test
- Make sure you can delete your record ok.
- Make sure that it automatically updates the table after you hit the delete button and the user doesn’t have to hit refresh to see the record go away.
Turn in
- A GitHub URL to the source code for where your back-end validation happens.
- An Amazon URL to your code where I can confirm that records are deleted.
Extra Info
For safety sake, we could implement a pop-up confirmation before deleting a record. That wouldn’t be a bad idea at all, but it is more than what we have time for.
Another option besides a full table refresh, upon confirmation from the server that the record was deleted, we could just remove that record from the table. Right now we aren’t confirming the server deleted the record, and we already have the function to update the table, so this is easiest on the developer. But with a high-volume website, we could save a call to the server by doing it the other way.