7.6. AWS Software Setup
Now we have our server up and running. As a review:
- We created our own server using Amazon’s “EC2” cloud service. There are other companies that also do cloud computing, like Microsoft. Eventually we’ll use the “S3” service from Amazon as well.
- Our server is running the “Ubuntu” operating system. Ubuntu is a name-brand version of a operating system called “Linux”. Basically, Ubuntu is Linux with a bunch of stuff added on to it, making it easy to use.
- Linux is based off another operating system called UNIX. So is the operating system for the Mac. The commands we type at the terminal are all very similar between the types of operating systems. Windows isn’t based on UNIX and is a bit different.
We also know our way around the command prompt. Let’s use this knowledge to set up our web server.
7.6.1. Adding the Deploy Script
We’d like to have our server automatically grab the latest code from GitHub each time we push new code up to the repository. That way we don’t have to log into our web server each time there is a change.
To do this, we will create a “deploy script.”
- Start with a project that you already have worked on. Probably your last assignment.
- You will want your own copy of the project. (If the project is currently under your account, you can skip this step.) Go to the project and create a “fork”:

- At this point, you have a copy of the project under your name. You will need to “clone” the new fork that you created. Clone it into a new folder on your computer. Remember, to clone your project, you’ll use a command like the one below, except with your link. Not mine. Use the “https” method of closing and not “ssh”.
cd Desktop
git clone https://github.com/pvcraven/cis_bakery.git
- If it says you already have a folder with that name, just rename the old folder and try again.
- Select the branch that you want to work on. It will default to
the
masterbranch if you don’t specify one. Remember, to list the branches and check out the one you want:
git branch -a
git checkout name_of_my_branch
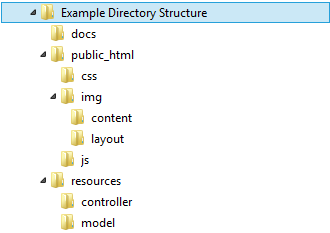
- We will assume you have a directory structure created something like the image
below. If not, adjust it now. The most common issue I’ve run into would be
people who have a
public htmlfolder instead of apublic_htmlfolder. No spaces!
- Create a new file in the public_html named
deploy_script.php. - Paste into
deploy_script.phpthe following code listing. This page, when accessed, will go to GitHub and update our website.
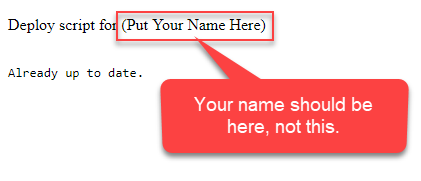
Attention
Where the file says “Put your name here”, please actually put your name there.
1 2 3 4 5 6 7 8 9 10 11 12 13 14 15 16 17 18 | <!DOCTYPE html> <html lang="en"> <head> <title>Deployment Script</title> </head> <body> <p>Deploy script for (Put Your Name Here)</p> <pre> <?php $output = shell_exec("cd ..;git pull 2>&1"); echo $output; ?> </pre> </body> </html> |
You don’t need to know how the code above works, but if you are curious, here is the explanation.
The command shell_exec will run a command at the
operating system level. That is, it will be like if we typed in a command
at the command prompt. But instead of us, it will be the web page that does
the command entry.
We can chain several of these commands together by separating them with semi-colons.
The command uses git to pull the
changes, and then update the files with the changes. The 2>&1 redirects both
the standard output (stdout) and the error (stderr) to be captured into the
$output variable. If you aren’t familiar with standard input and output
streams, check out the
Wikipedia article on
the subject.
We will eventually set GitHub up to call this web page when we push new code to the repository. For now, just create the file and add it to GitHub.
Attention
Make sure your are on the proper branch. Add the deploy.php file. Commit. Push.
7.6.2. Installing and Updating the Software
Connect to your server via SSH using the Mac’s Terminal program or the MobaXTerm program.
We need to update the software on the server, and install new software. Enter these commands. You can copy/paste them if you like. Note that most terminal programs use shift-insert to paste, and not ctrl-v.
Attention
Copy the commands one line at a time.
sudo apt-get update

# For the next two, if you are asked questions during the update/install, just hit 'enter' for the default
sudo apt-get -y upgrade
sudo apt-get -y install apache2 git php
The first line checks for software updates. The second line installs them. The third line installs those four new programs that we will need for our webserver.
In detail, here’s what the commands mean:
- Line 1:
sudomeans “Substitute User Do”. It allows us to run the next command as someone else. It defaults to the root (administrator). Since we are installing new software, we need to do it as the administrator.apt-getis the software manager.updateis a apt-get directive that tells apt-get to go check for updated software. It doesn’t update it, it just checks for updates.
- Line 2:
apt-getis the software manager.-ytells apt-get that the answer is “yes” to any questions it asks.- upgrade downloads any updated software we found in the prior step. Normally it would list out all the software packages and ask, but we already told it yes with the -y.
- Line 3:
installdirective for apt-get asks to install new software. There are four software packages listed.apache2is the web server,phpis the application server, andgitis our version control software.
Note
Terms people often confuse:
“git” is the software we use for version control. “GitHub” is the web site we use to store our git code.
“Apache” (version 2) is our web server software. Not EC2 (which is the Amazon service to make machines) or AWS (which is all of Amazon’s services.)
“apt-get” is our software manager. MobaXTerm is software we use to use SSH and shell over to our server to type commands. MobaXTerm does nothing but allow you to type commands on that other server.
7.6.3. Check the Web Server
Check to see if your web server is running by going to the DNS name of the server. Remember, you can get the address here:

Then paste it in the web browser. You should get a default page like:

7.6.4. Installing an Encryption Key
Next, we need a key/pair to handle the connection between our server and GitHub. Use these commands on the terminal, updating the e-mail address to your own. When it asks for a pass-phrase, just hit “enter.”
In detail, here’s how the commands break down:
- Line 1:
cdis the “change directory” command. By the file system hierarchy default, all the web stuff on most Linux machines will be stored in/var/www. - Line 2:
mkdirmakes a directory. The.sshdirectory is where a users public/private keys are stored. In the case of the apache process, the home directory is/var/wwwso we put the.sshfolder here. - Line 3:
chownchanges the ownership of a file. Because we created .ssh as root, we need to change it to the owner of the Apache web server process which iswww-data. We are changing both the user and the group, so that is why there is a colon and the user name twice. - Line 9: The
sudo -u www-datatells the computer to run the next command as the www-data user. This is the user that Apache runs under. We want to create the key as the user Apache runs under, otherwise Apache won’t be able to access it. The commandssh-keygen -t rsa -C "your.email@simpson.edu"generates an RSA key/pair. By default they will be stored in the users.sshfolder, which in this case is/var/.ssh. - Line 10:
ssh-agent -sstarts a background process that manages the keys. - Line 11: The cat command prints the contents of a file to the screen. We will pass the contents of the id_rsa file to GitHub to finish the connection.
1 2 3 4 5 6 7 8 9 10 11 12 13 | cd /var/www sudo mkdir .ssh sudo chown -R www-data:www-data .ssh # Stop! Enter this next line (below) by itself. # It will ask three questions. Hit 'enter' for # each one. Don't keep pasting the other lines # in for each question. You can update with your # e-mail but it isn't necessary. sudo -u www-data ssh-keygen -t rsa -C "your.email@my.simpson.edu" sudo -u www-data ssh-agent -s cat .ssh/id_rsa.pub |
The last command will output your key to the screen. Highlight it. Copy it using ctrl-insert instead of ctrl-c. Don’t save this key in your version control either!

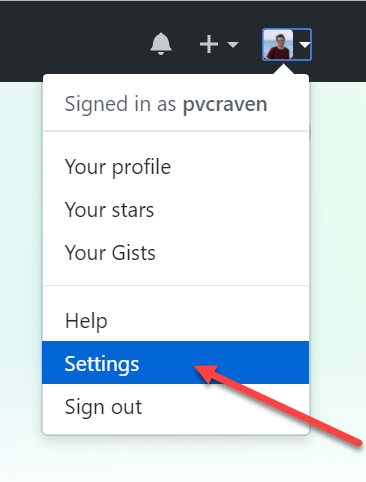
Go back to GitHub and add it as a deployment key. Select your profile icon in the upper right of the screen and then select “settings”:
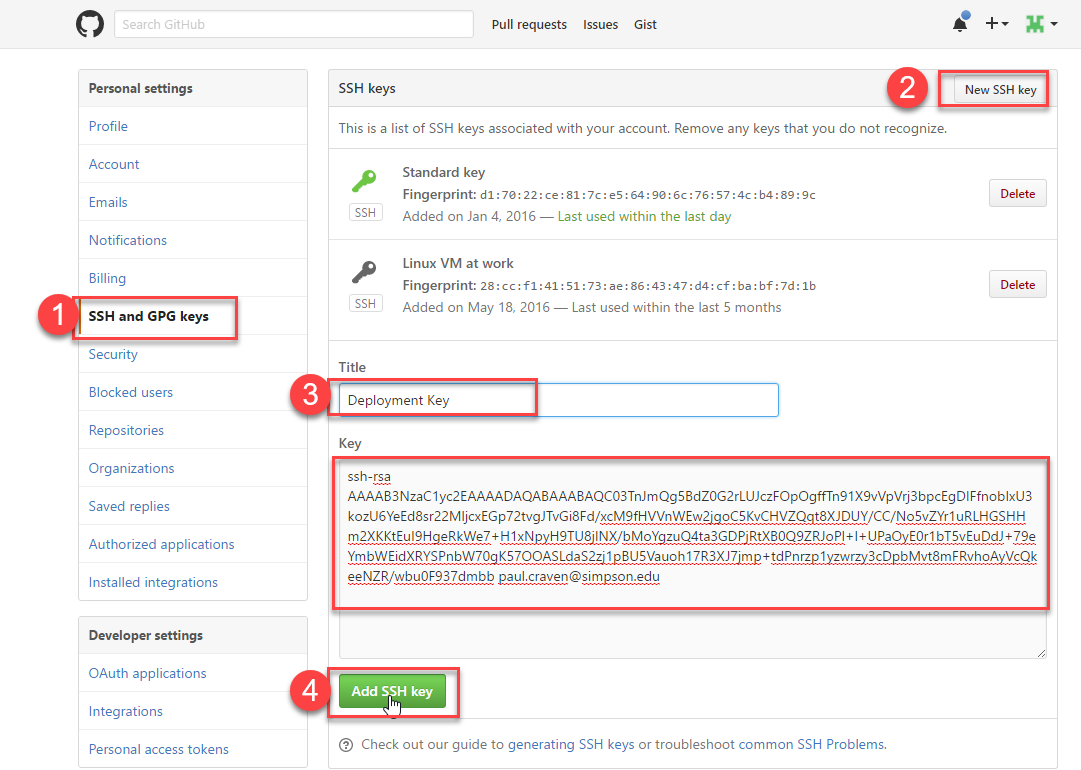
Add in the key:
7.6.5. Clone the Repository On The Server
Now we need to get the code set up. Enter the commands below. Replace sample-web-project with the name of your GitHub project. Replace pvcraven with your own GitHub id. After you enter line four it will give you a warning about adding a key, answer “yes” to that warning.
Attention
Don’t blindly copy/paste. Don’t use “sample-web-project”, use the name of your project as it
exists on the GitHub URL. There are three places you need to do so in the script
below. Also, replace the_branch_i_want with the branch that you want to be shown.
1 2 3 4 5 6 7 8 9 10 11 12 13 14 15 16 17 18 19 20 21 22 23 | # Change to the directory (cd) that has our web files: /var/www cd /var/www # Update the next line with the name of your project, as shown in your # GitHub's URL. sudo mkdir sample-web-project sudo chown -R www-data:www-data sample-web-project # Update "pcraven" in the next line with your GitHub id # Update "sample-web-project" with your web project # (You can also copy from the 'clone' button on GitHub if you select # SSH type of cloning.) # You will likely be asked a yes/no question. Go ahead and type 'yes' sudo -u www-data git clone git@github.com:pvcraven/sample-web-project.git # If you are using any branch but "master", then select the branch below: cd sample-web-project # List branches sudo -u www-data git branch -a # Select the branch sudo -u www-data git checkout the_branch_i_want |
7.6.6. Point Apache Web Server to Our Files
Apache saves all of its setup information in text files. Exactly where these files are and what they are named is not exactly intuitive. With some Googling you can find this. Or just read below:
# Change to the directory with the configuration information
cd /etc/apache2/sites-available

# Use the 'nano' editor to edit this file
sudo nano 000-default.conf
Alternatively, we can use Vim to edit the file instead of nano:
# Use the 'vim' editor to edit this file
sudo vim 000-default.conf
Update the file’s DocumentRoot to point to the directory that holds your
web site. See the highlighted line below that you should edit:
Attention
Don’t use the mouse in nano. Use the arrow keys on your keyboard to move around. To exit out of the “nano” editor, hit “ctrl-x”, hit “yes” to save, and then “enter” to save as the same file name.
1 2 3 4 5 6 7 8 9 10 11 12 13 14 15 16 17 18 19 20 21 22 23 24 25 26 27 28 29 30 31 | <VirtualHost *:80>
# The ServerName directive sets the request scheme, hostname and port that
# the server uses to identify itself. This is used when creating
# redirection URLs. In the context of virtual hosts, the ServerName
# specifies what hostname must appear in the request's Host: header to
# match this virtual host. For the default virtual host (this file) this
# value is not decisive as it is used as a last resort host regardless.
# However, you must set it for any further virtual host explicitly.
#ServerName www.example.com
ServerAdmin webmaster@localhost
DocumentRoot /var/www/sample-web-project/public_html
# Available loglevels: trace8, ..., trace1, debug, info, notice, warn,
# error, crit, alert, emerg.
# It is also possible to configure the loglevel for particular
# modules, e.g.
#LogLevel info ssl:warn
ErrorLog ${APACHE_LOG_DIR}/error.log
CustomLog ${APACHE_LOG_DIR}/access.log combined
# For most configuration files from conf-available/, which are
# enabled or disabled at a global level, it is possible to
# include a line for only one particular virtual host. For example the
# following line enables the CGI configuration for this host only
# after it has been globally disabled with "a2disconf".
#Include conf-available/serve-cgi-bin.conf
</VirtualHost>
# vim: syntax=apache ts=4 sw=4 sts=4 sr noet
|
To exit the nano editor hit “ctrl-x”. Then after that, it will ask if you want to save the file. Hit “y” for yes. Then it will ask you what file name. Hit the “enter” key to just accept the same file name that you loaded.
To exit vim, type escape, followed by two upper case Z’s to save and exit.
(Or type :wq)
7.6.7. Restart the Web Server
Great, now that you’ve edited the file, restart the web server. Make sure you are no longer in the text editor, and at the command prompt. Type:
sudo service apache2 restart
See if your web pages are showing up now.
If your web pages are not showing up, then you need check to make sure that you have the correct directory specified.
Try typing:
# Change to the /var/www directory:
cd /var/www

# List the files in the directory:
ls
At that point, see if you spot a directory that should have your files. Then type:
# Change to sample-web-project
cd sample-web-project

# List the files in the directory:
ls

# If there is a public_html or some other directory that has your files:
cd public_html

# Once you've found your files, Print the Working Directory with the pwd commmand:
pwd

# Copy this, and go back up and re-edit the Apache config file and
# restart Apache again.
Does your website show up? Excellent! Copy the URL. This is part of your assignment.
7.6.8. Check Deployment Script
We created a web page that will automatically run git pull for us if we access
it. This is way easier than having to shell to the server every time we update.
Let’s see if it works. Go to your web address, but instead of index.html go
to the deployment script. It should look like:
http://ec2-34-220-32-180.us-west-2.compute.amazonaws.com/deploy_script.php
Make sure to use your ec2 server address instead of mine. Just add the deploy_script.php
to the end of yours.
Your page should look like:
If you get a 404 file not found error, then something went wrong. Ask your instructor for help debugging.
If it works, then we can access that page anytime we want to update our server to the current code. But we can make it even easier by having GitHub to that step for us by “installing a webhook.”
7.6.9. Installing a Webhook
Next, let’s create a “webhook.” When you push new code to the server, GitHub will automatically fetch a web page for you. So try this:

Once you add the hook, GitHub will automatically call that web page when you push new code to the server. That web page will do an update, and your website will have the most current code.
Test it out! Make a change to your web page, and push the change to GitHub. In a few seconds, you should see your web server update with the change.
7.6.10. Even More Info
It is a great time saver to do automatic build, deployment, and even testing. You are not limited to just websites, almost any application can be built and deployed in this manner. Websites like www.appveyor.com specialize in helping people create these setups.